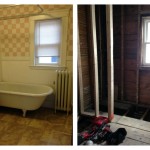
One of the things we really liked about our house when we first saw it was the dated but relatively big (for Boston, anyway) bathroom. It was never nice, and…
Bathroom remodel: Part 2
So, where were we? Oh, right — getting ready to remodel our bathroom. To recap: We live on the top floor of a two-family house, and our laundry was down two flights of narrow stairs in the basement. So we decided to remodel our small (and only!) bathroom by moving the toilet across the room and carving out space to include a stackable washer and dryer.
Well, we did it — and in fact we’ve spent almost a year with our new bathroom now. Here’s how it all went down, and some lessons we learned from our bathroom remodeling adventure.
Designing a new bathroom layout
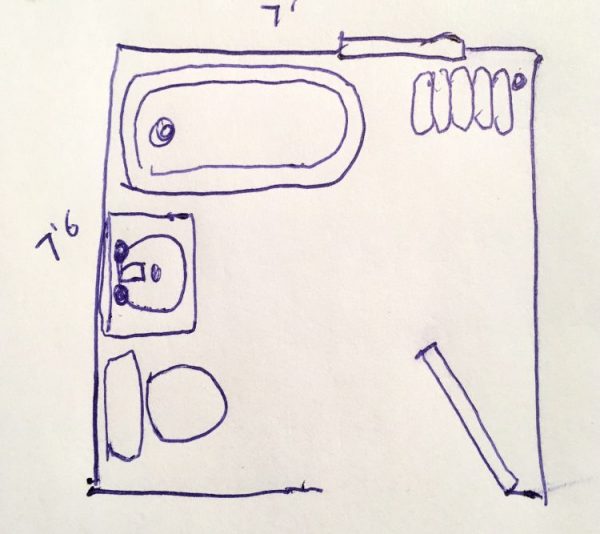
Our 7′ x 7’6″ bathroom is by no means big, but it’s not tiny. Here’s what the original layout looked like – you can see there was some wasted space behind the door, where we kept a little IKEA storage thing:
With more than 50 square feet to work with, I knew there had to be a way to fit a washer dryer in the bathroom without making it feel like a shiny, tiled coffin. But how?
I got some graph paper (how awesome is graph paper?) and sketched out layout after layout, trying to fit the puzzle together: moving the sink here, the shower there, the toilet to this side… any configuration I could think of.
The washer dryer couldn’t block the window, that much was true. And we wanted the tub away from the window if possible, to let in more light — and that wall is the longer one, better suited to a tub and all the plumbing.
Every time I thought I found a solution, I’d realize that I’d forgotten to leave room for the big old cast iron radiator. Finally, we thought: What if we could get rid of the radiator altogether to free up some space? It turns out, we could — by using radiant heat floors (the pricey option) or installing a small electric heater in the wall (the cheaper option, which we chose).
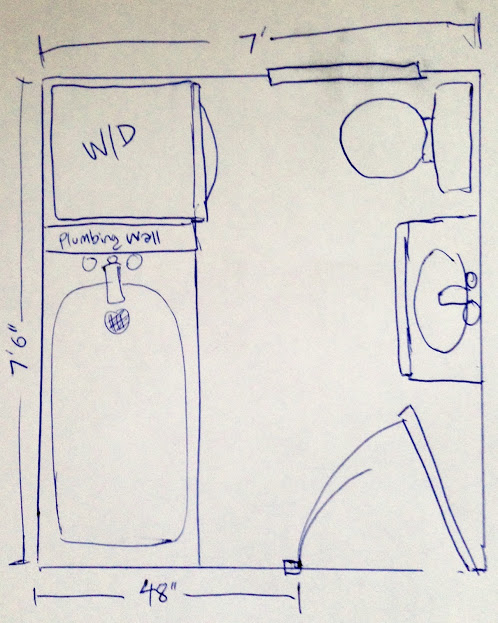
In the end, here’s the floor plan we decided made the most sense:
Here’s the contractor’s more professional version:
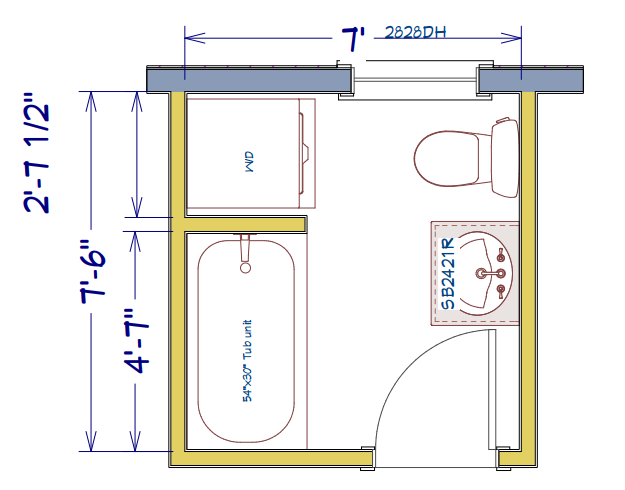
It meant using a slightly shorter tub (54″ vs. the standard 60″), but that was fine with us; it’s an apartment, not a villa. A lot of the plumbing would stay in the same corner, which is important to think about.
But what we didn’t realize was how difficult a job it is to pitch a toilet drain all the way across the room (to meet up with the main sewer pipe): You need the toilet drain pipe to be angled downward, not just flat across – and you cant just drill giant 4″ holes through all your support joists to get it across the room.
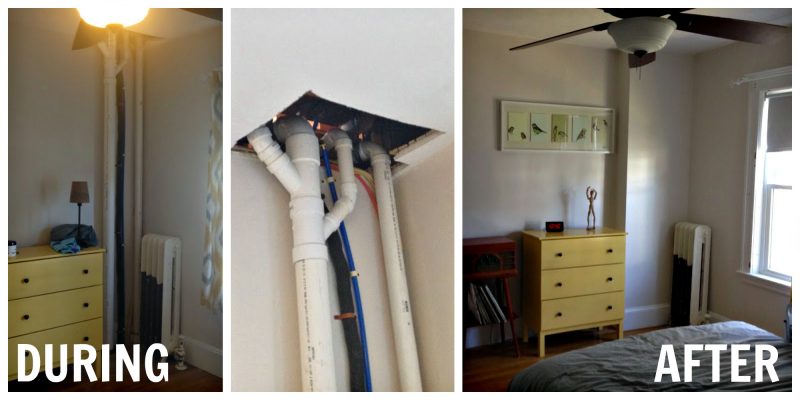
Luckily, Craig at Almar Building had the brilliant idea of running an all-new toilet drain and supply lines out the back and down through the first-floor bedroom, down to the basement. Then they’d just box off the pipes in that bedroom, in a little indent about 9 inches by 2 feet.
To do it, they had to rotate the cast-iron radiator that was up against the bedroom wall, and move its supply pipe a couple of feet over — but all in all, it came out really nicely, and saved tons of work and money (though I still need to paint the rotated radiator):
Lesson learned: It’s ok to think outside the box. Explain your vision and ideas to a couple of contractors and see what they think — a good one can tell you what’s feasible and what isn’t. Also: Talk to multiple contractors, of course. The other guy who gave us an estimate came in higher because he didn’t think of this simple workaround.
Staycation (i.e. living in exile)
Some bathroom remodels are a pretty straightforward, quick job: Rip out the old stuff (tiles, tub, vanity, toilet, lighting, even the walls if they’re gross), and replace it all with new versions of the same stuff in more or less the same formation. That type of bathroom remodel should only take one to three weeks.
Our bathroom remodel was not straightforward. We were adding a ton of new plumbing and changing the whole configuration. It was kind of a massive job that required coordinating a carpenter, plumber, electrician, and tiler, among other moving parts and people.

On the left is the frame for the new plumbing wall.
They estimated it would take five or six weeks, so of course it took seven. Luckily, this was all happening during the late-winter offseason, so we moved into our empty Airbnb rental unit downstairs.
Our daughter kind of enjoyed the novelty of living downstairs – it was a whole new home, but weirdly familiar – and to be honest, we kind of liked how clutter-free it felt. There’s very little in the way of stuff down there (it’s a vacation rental, so just the basics), and that was refreshing.
We only brought a few toys down for our daughter, but she played with them religiously – it’s like, without all the other toys lying around vying for attention, she was more content with the few she had.
We would sneak upstairs periodically to check on their progress or grab a (dusty) toy or box of cereal, but for the most part we lived in exile downstairs for almost two months. It got a little old eventually, but we were sure glad we had the option.
Lesson learned: Even if it’s not your only functioning bathroom under construction, consider making arrangements to live off site (or even go on vacation) during a remodel, because there’s no way around the fact that your home will be a noisy, dusty, mess during the project.
Tile trouble
Why did it take an extra week? Well, Almar forgot to order the floor tiles, even though we specified the ones we wanted long before construction began, and they weren’t anything you can’t find at Home Depot or Lowe’s. In fact, when they told me everything would get pushed back a week because they were waiting on the floor tile, a) I kind of flipped out, and then b) I bought the tiles on Wayfair with 2-day shipping. This is not rocket science, or Italian marble.
But the damage was done – their tile installer had moved on to another job and wouldn’t be back til the next week. And then, whether because the tile pro felt they had to rush the job, or they’re just plain terrible at it, they proceeded to screw up all over the place.
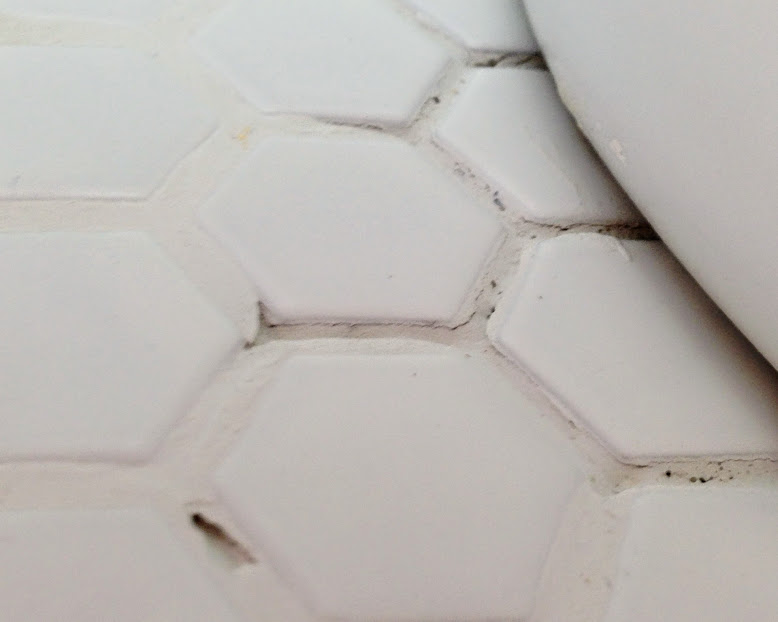
The first day, they installed the backing board and leveled the floor and all that. So far, so good. Then they put down the floor tile, and left for the day without apparently noticing that the little florets weren’t lined up:
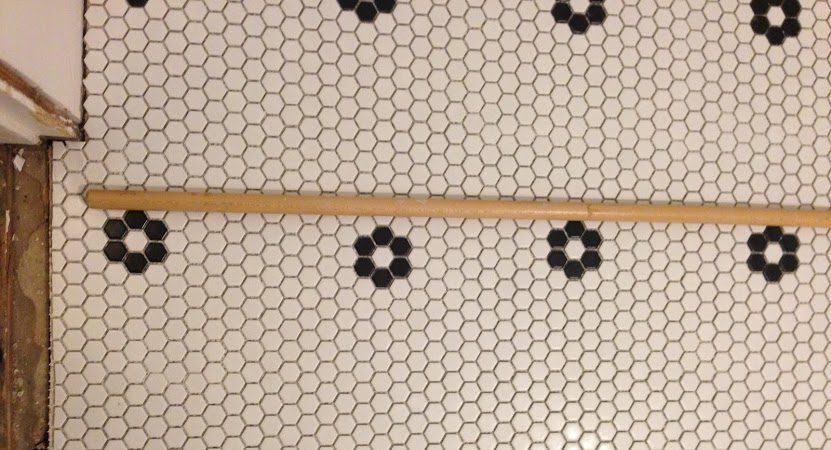
It was like that all over the bathroom, a whole bunch of them just one hexagon off. I mean, come on, I’m not a tile installer and I noticed that with my naked eye after 1.5 seconds. But they tried to say they hadn’t noticed, which means either a) they were lying or b) they’re really terrible at tiling, because c’mon.
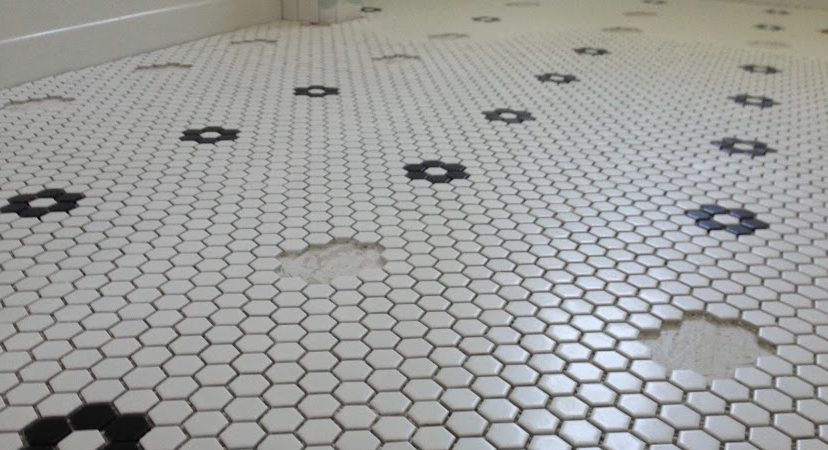
Anyway, after some minor panic on my part, it turned out it wasn’t too big a deal — they just had to pop out some of the little hexagons and shift them over:
Still, it delayed things even further, and then they rushed the grout process, or used cheap grout, or just suck at grouting, or all of the above. In any case, the grout was too watery and full of air bubbles, and it shrank too much when it dried or they were too forceful wiping it off, and it left us with air pockets and massive gaps in the grout. Also did I mention this tile installer was simply terrible at their job?
I had it out with the contractor over this, and somehow they managed to placate me at the time with some minor fixes, mainly because by Week 6 we just wanted them out of our house and to be able to flush our damn toilet again.
So anyway, this is the one part of our bathroom remodel I’m still unhappy with. I’ve resigned myself to the fact that at some point soon I’ll be digging out their crappy grout job and re-doing it all myself (I even bought the tool for it). Or perhaps I’ll pay a (better) tile pro to do it.
The contractor, Almar, went above and beyond for us in other areas, particularly their carpenter (Trey), so I didn’t want to put the screws to them or anything. But jeesh, that’s pretty shoddy tiling work, right? In fact, revisiting all this is enough to give me heartburn even now, so I think it’s time we move on…
Lesson learned: Factor extra time into the schedule so you don’t feel pressured to rush, or be rushed. Leave enough time to allow for fixes when necessary, because something is bound to go wrong and the time to take care of it is during the remodel, not later.
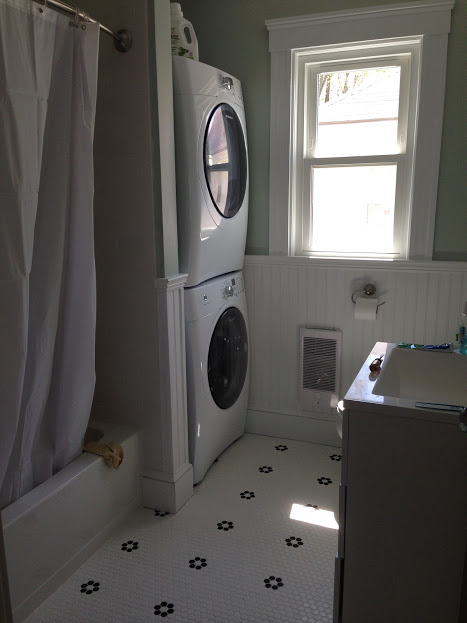
Second floor washer/dryer
We were knees deep in this project before we started reading horror stories about washing machines on the second floor — that the excessive vibrations could harm the structural integrity of your home, rattling the foundation or upper-floor support beams, and a loud washer or dryer near the bedrooms would keep the whole family awake at night.
By the time we heard about any of this, we were in too deep to turn back. But we hadn’t yet purchased a washer/dryer combo, so we paid close attention to vibration and noise, not just size and price. (Size was still the No. 1 concern: We wanted a full-size washer and dryer if at all possible, but it had to fit in the roughly 30″ x 30″ alcove, with a bit of room to spare for hoses and the dryer vent.)
A lot of stackable laundry units are designed for very small spaces, and were basically too small – they only fit a half a load of laundry, and would have had an awkwardly large amount of space on either side.
After poring through online reviews and Consumer Reports, we settled on a stackable Electrolux combo (EIFLW50LIW and EIED50LIW) — made by a European company, it was slightly more compact than similar washer/dryers from Samsung, LG, and GE, and the dryer exhaust could be vented with zero clearance in any direction.
That crucial detail meant we could get it almost flush to the back of the alcove, and vent it right out the exterior wall. What’s more, Consumer Reports named it one of the quietest models, and it came with a “Second Floor Guarantee” that it won’t shake your floor joists apart like some kind of laundromat earthquake.
We’ve been running it several times a week for about a year now, and I can definitely say: So far, so good. It’s quiet enough to watch TV in the other room while it’s running, and it doesn’t keep anyone from sleeping (unless someone forgets a quarter in their pants pocket). The vibration on the spin cycle doesn’t seem to affect the floor at all, and you can set the spin speed — so we usually stick to medium instead of high, just to be safe. Best of all, it’s nice to look at, easy and efficient to use, and it gets our clothes clean.
However, there’s one other issue with a second floor dryer that I hadn’t thought about. You’re supposed to clean out your dryer vent once a year or so, to keep it running efficiently and also to prevent fires as lint, hair, and other detritus gathers in there.
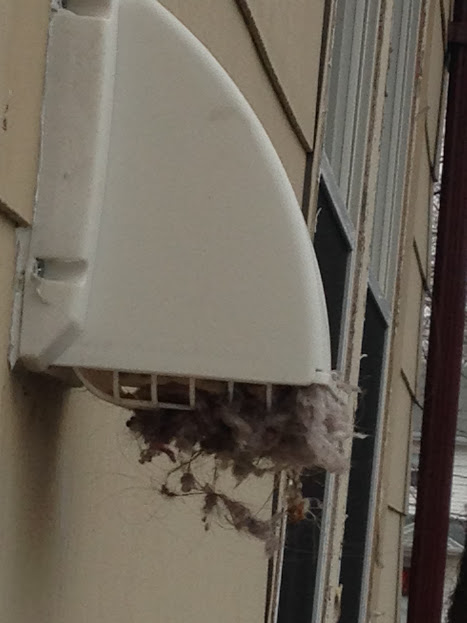
Well, our vent sticks out the side of the house, like 40 feet up, and I’m terrified of heights. Plus, I can’t quite reach it out the window. So to clear the exhaust vent periodically, I’ve taped a fork to a small broom handle, and I lean out the window like some kind of caveman poking and pulling and trying to scoop out the lint and stray hairs that have accumulated in the grate.
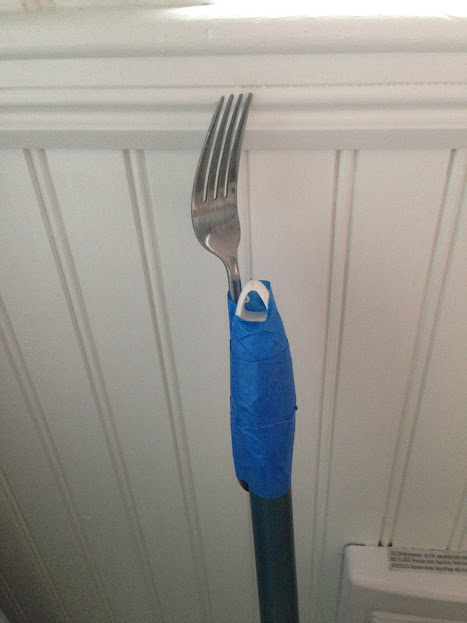
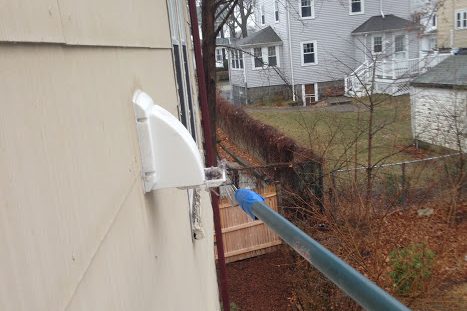
It’s insane, really, but it works and it needs to be done. I also plan to have our gutter cleaners get in there to clear out the entire dryer vent once a year. It’s still way better than trudging loads of laundry up and down two flights of stairs!
Lesson learned: I would have paid a bit extra to have the contractors build an access panel on the wall behind the washer and dryer (in our daughter’s bedroom). We eventually may have to do this anyway, because right now, if anything breaks or a hose disconnects back there, it’s virtually impossible to get at without pulling the entire thing out, and that’s not easy to do.
How much does it cost to remodel a bathroom?
Well, I can tell you how much it cost to remodel our bathroom — it was a hair over $20,000, plus the cost of the washer and dryer. But this was not your typical bathroom remodel: On top of all the usual cosmetic upgrades, they moved all the critical plumbing fixtures, including the toilet, built and boxed off an entire new drain system, and added new big-deal appliances that require special plumbing and electrical service.
However, we did save some money in spots:
- We kept the toilet and vanity we’d purchased a year earlier (they were still in fine shape and matched what we were looking for), saving about $600.
- As I mentioned earlier, we opted for the cheaper in-the-wall electric heater vs. radiant heat floors — that was a difference of about $300 compared to $1,000 or more. We’re pretty happy with the little electric heater, but then again we’re not exactly luxury folks.
- We did our own painting, which took two separate days. The bathroom is a small room, so you make pretty quick progress, but it did require a few coats since we were painting straight onto drywall.
Perhaps because we skimped in those spots, we ended up falling pretty squarely within the average price range for a bathroom remodel: In my research, a typical bathroom remodel should cost you around $15,000 to $24,000 at the high end in and around Boston.
Lesson learned: There are always ways to trim a few hundred bucks here or there by cutting back on higher-end options you may not need or fully appreciate, or by doing some parts of the job yourself.
Painting
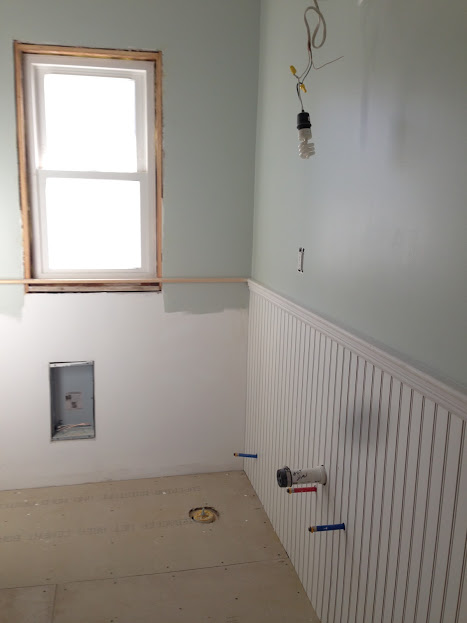
We did the painting ourselves, on two separate days. The first step was to prime and paint the walls during an off-day — before any of the fixtures, trim, wainscoting, or tile was installed:

We used Sherwin Williams Sea Salt, a nice grey, sea foam color, and we love the way it looks. They recommended we save one last coat for when everything was done, in case there were any scuffs or scrapes during installation of the washer-dryer and stuff.
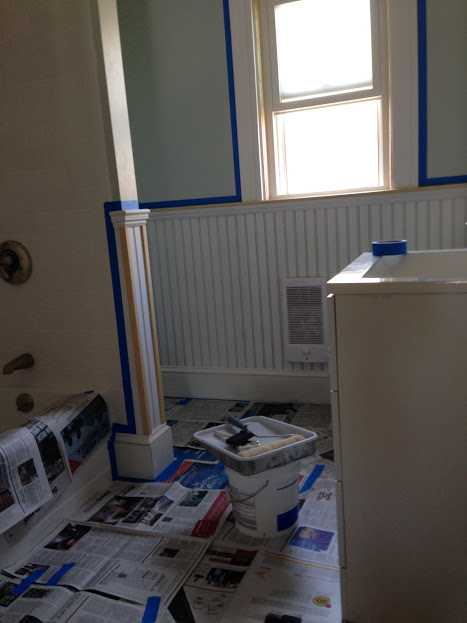
Once the bathroom construction was completely done, I primed and painted the wainscoting and trim (a semi-gloss white finish) and gave the walls one more finishing coat of Sea Salt — this time with blue painter’s tape and newspaper protecting the tiled floor.
My other side projects
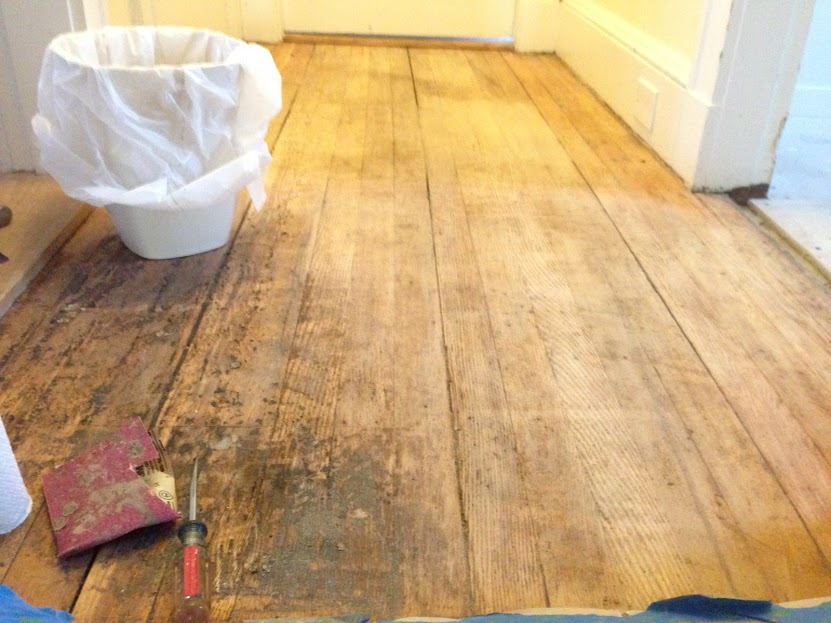
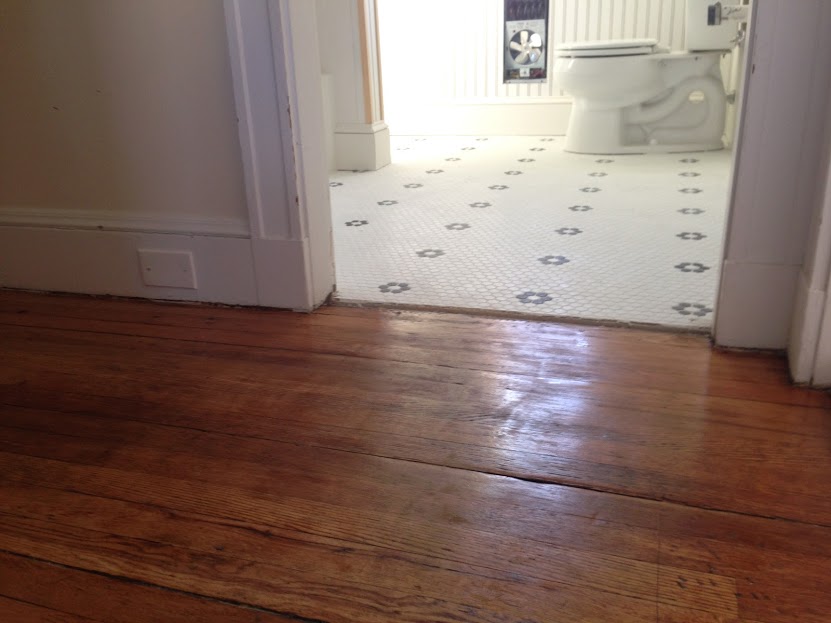
While they were working on the bathroom, I tackled a small, related side project: The little hallway outside the bathroom had the same old, gross vinyl tiles as the bathroom. I knew from experience in our unit downstairs that there would be nice hardwood floors underneath, so I made it my mission to find them, sand them down, and refinish them.
I will say, if the surface area were any bigger — it’s just a 7′ by 3′ hallway — I’d recommend hiring out for this work. It’s a hard job, and gross, and probably exposed me to harmful health hazards. But this was such a small area, I figured I could do it.
First, I scraped up the old vinyl tiles, and as much of the black adhesive goop as I could using a chisel, a flathead screwdriver, and other random tools. Old adhesive like that can potentially contain asbestos or other problematic, cancer-causing materials, so I used gloves, goggles, and a HEPA filter, and kept a water spray bottle handy to keep the area wet (to keep the particles from floating all over the place, ideally).
Then it was time to sand down the floors – to get the last of the goop off, but also to restore the shine of the wood. In a bigger room, you’d use a machine sander for this, but in such a tiny hallway I figured I’d do it by hand. Maybe not the best choice? I definitely ripped through some gloves and my hands got pretty raw by the end, but it worked well enough. Here, you can see my progress at about 75% done:
Finally, it was just a matter of brushing a couple of coats of polyurethane on there. I did this when the kid was gone for a couple of days, because man alive, that stuff stinks. It came out pretty nice, though not at all perfect — and that’s important. TOO nice and it wouldn’t match the rest of our house, to be perfectly honest!
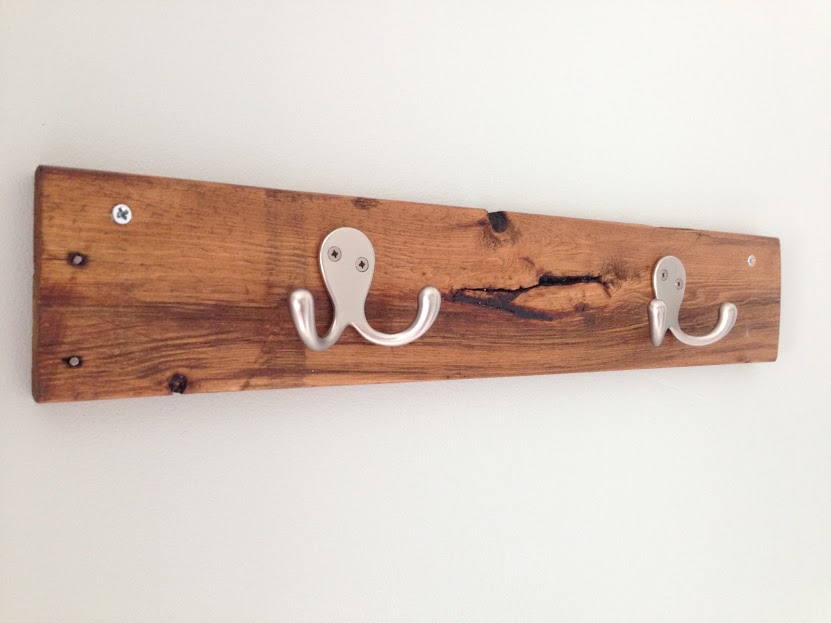
I gave myself a couple of DIY projects in the bathroom itself, too, besides the painting. I cut some boards off an old pallet, sanded and stained them (I added a bit of poly to the stain to give it some water resistance), and added towel hooks to one:
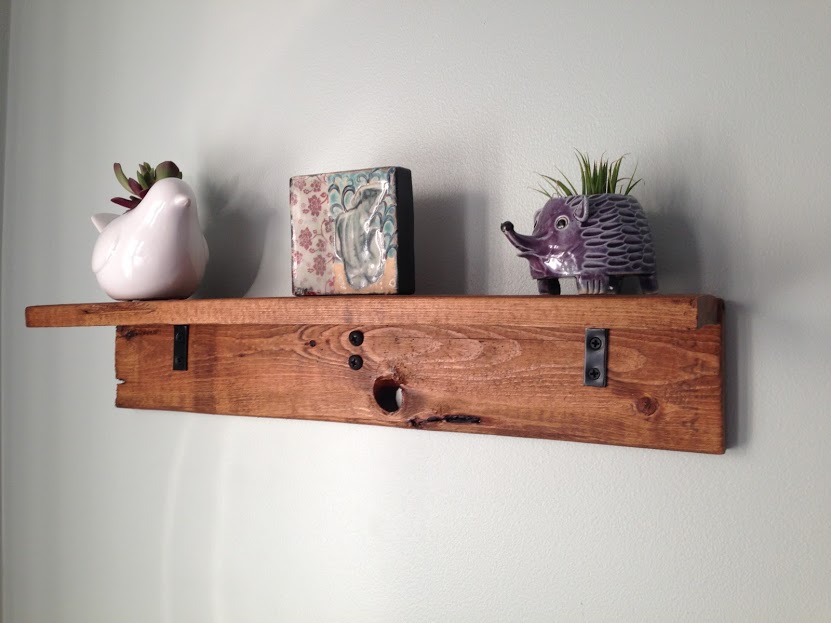
…and turned the other into a small shelf to go above the toilet.
Oh, and we also added one panel of opaque, no-adhesive window film to the bottom half of the window — to allow light in without flashing the neighborhood.
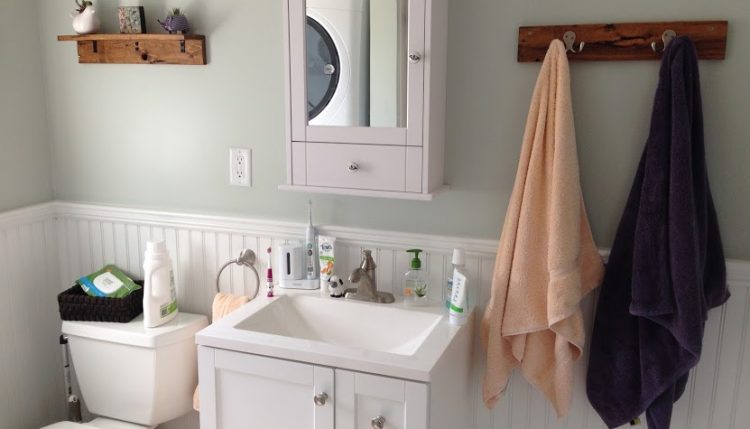
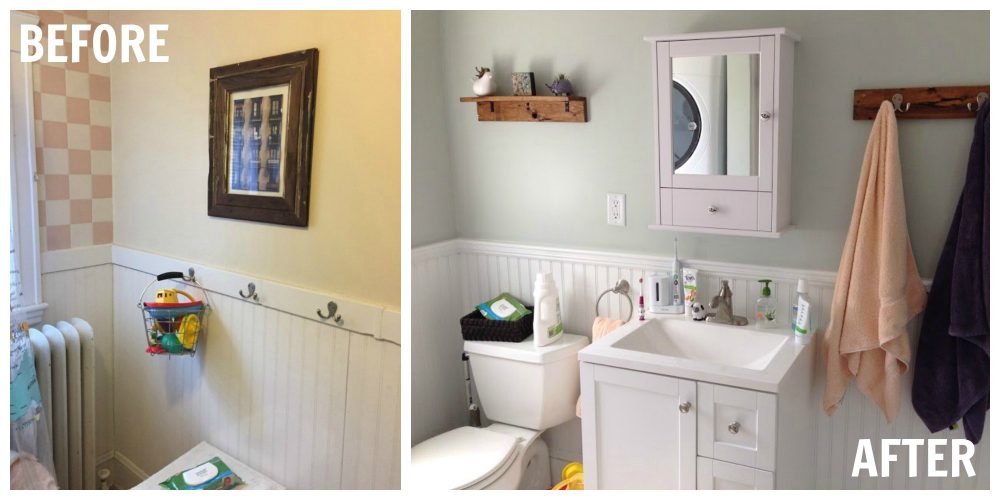
Bathroom remodel: Before and after photos
So, here’s a look at the final transition; it’s tough to capture because the layout is so different, but you get the idea. Also, I’m not some Pinterest perfectionist, so things are askew!
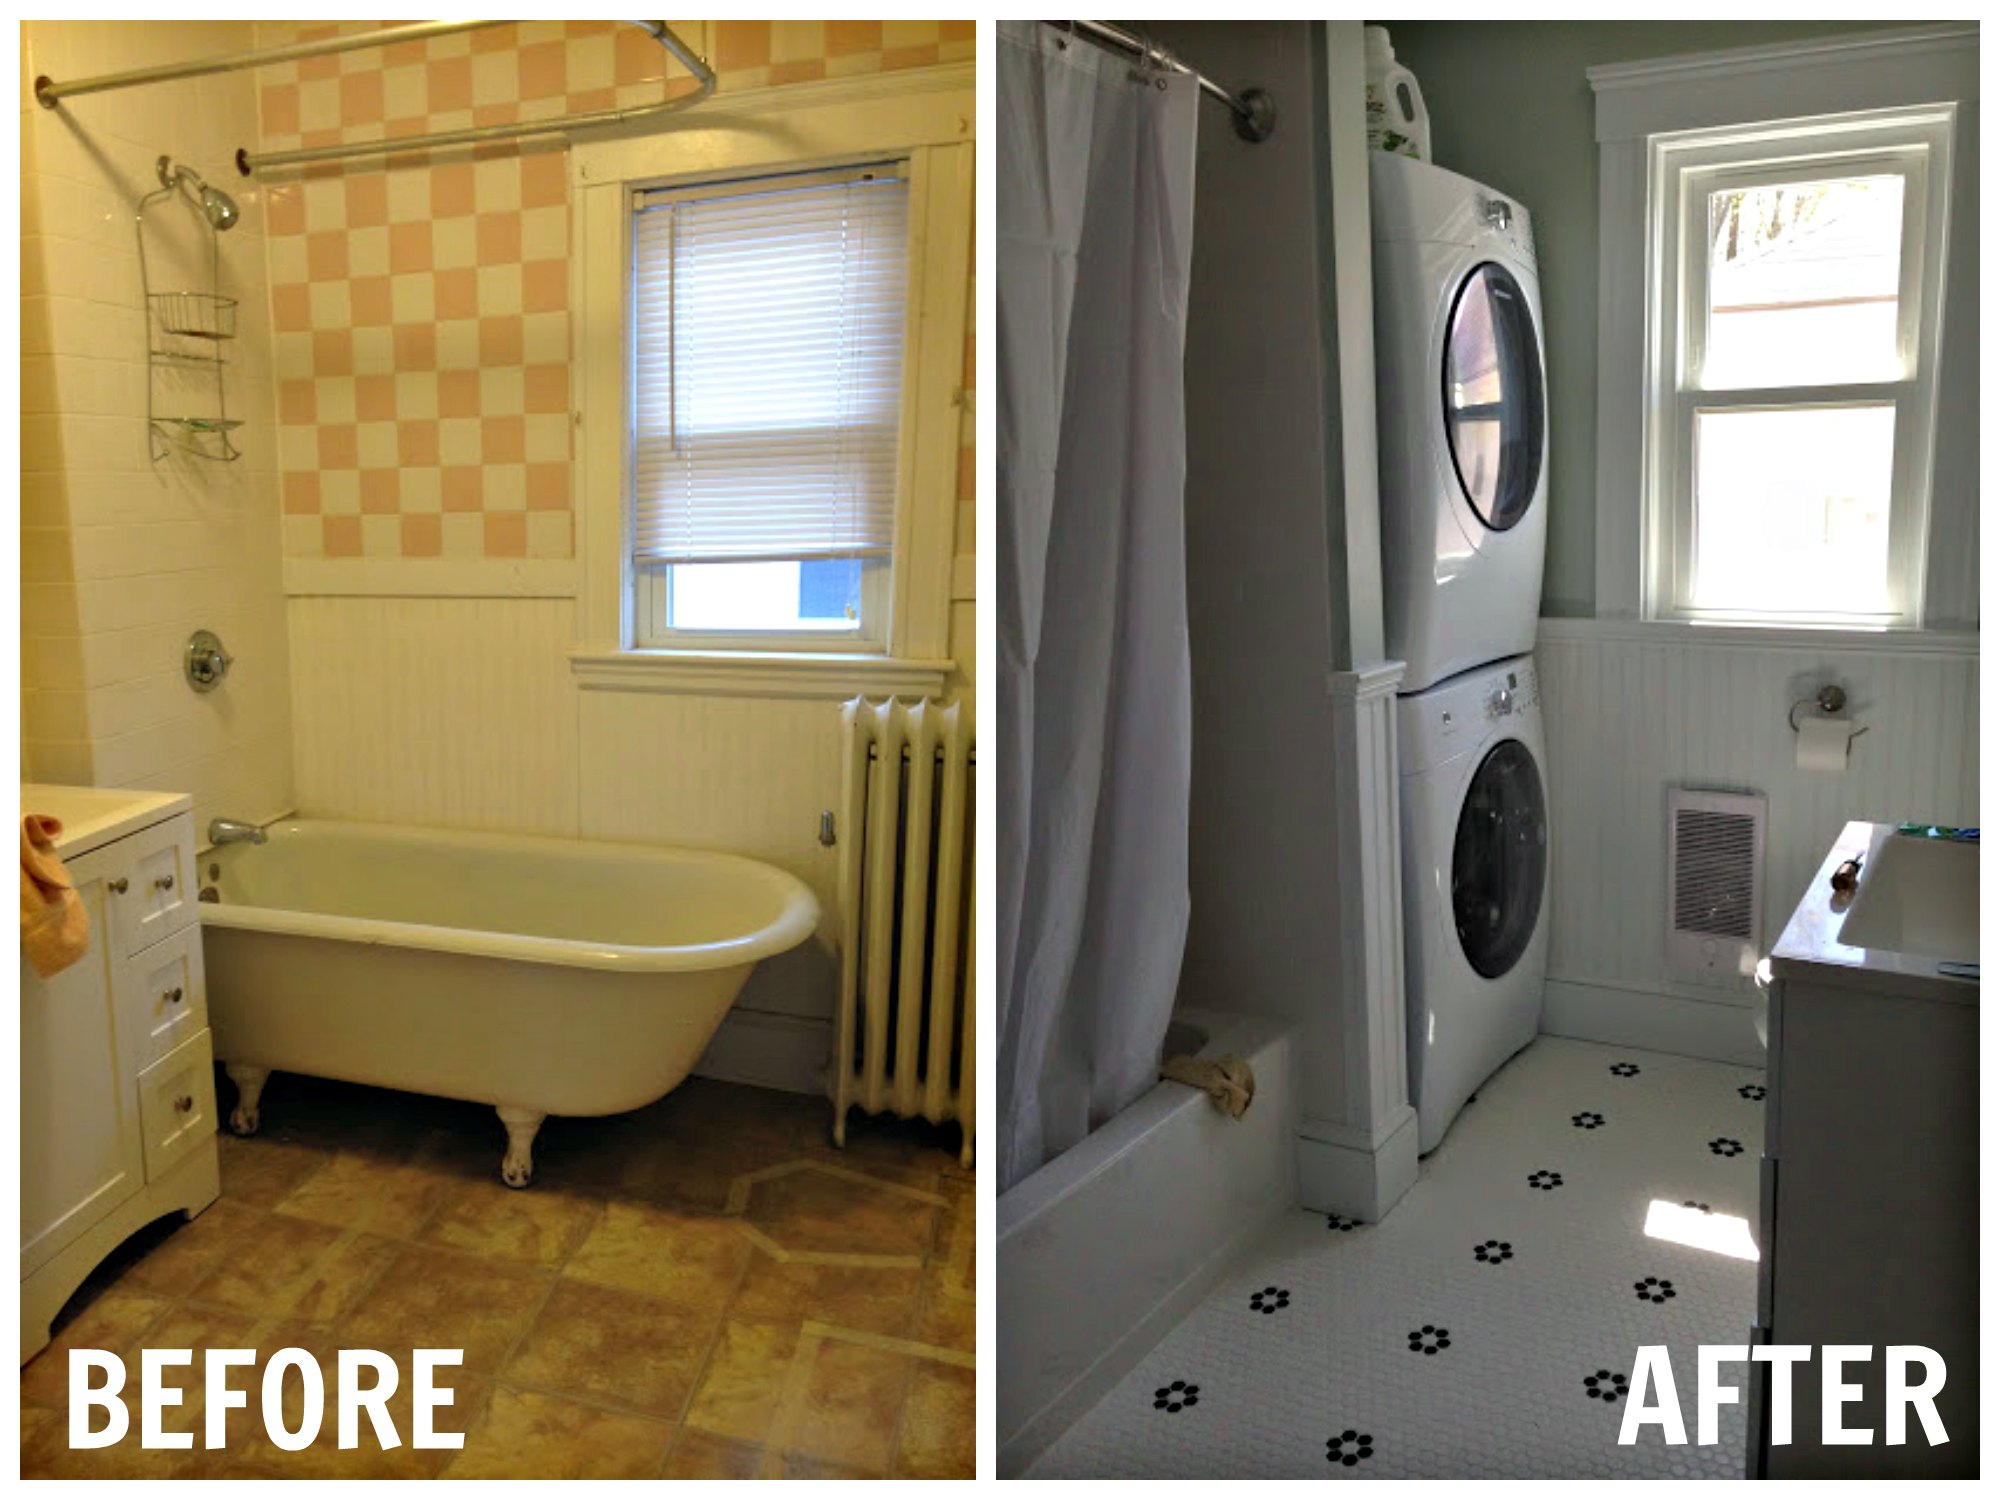
How about that pink checkerboard tile? And boy, I don’t miss the stick-on vinyl tile. Here’s the other side of the bathroom:
Lesson learned: Take lots of “before” photos, because you won’t get another chance!
Related posts:


Jon Gorey • April 27, 2017