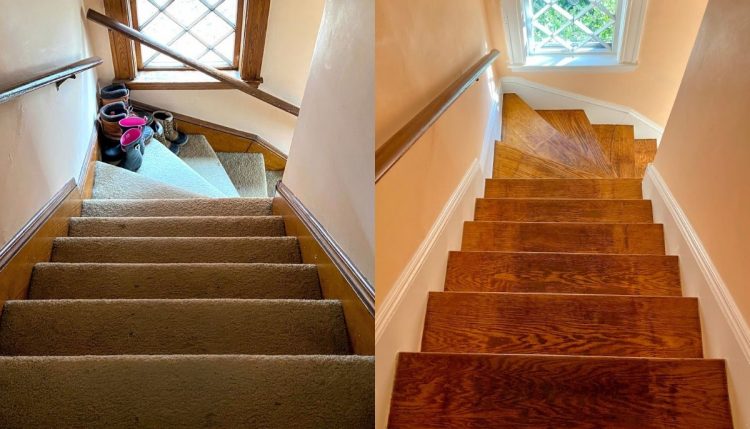
Stairway makeover: Pulling up old carpet to reveal glowing hardwoods
Our entry stairs have always had salmon-pink walls and beige wall-to-wall carpeting. The peachy walls actually grew on us over our first few years in the house — they glow with an inviting warmth in the afternoon sun. But the carpeting never did. Then I learned that carpets can be up to 200% heavier when you remove them, because of all the dust, dirt, pet dander, mold, skin cells, and other filthies that build up in them. Yuck!
Suddenly, I was a lot more motivated to rip up the carpet in our stairway.
So back in the early days of our coronavirus quarantine, I decided it was as good a time as any to pull up all the gross, old carpet in the entryway and refinish the hardwood stairs underneath.
Ripping up the carpet was hard and messy work. It was also the easy part! Sanding the steps, in particular, was brutal. The whole process took about four long days of work over the course of a few weeks, but it was all worth it — we’re really happy with the results.
Here’s how we pulled up the wall-to-wall carpet, sanded and sealed the stair treads, and painted the trim and risers to brighten up our entry stairway.
Warning: Working on stairs is tricky — be on constant guard not to lose your balance! This is especially an issue when you’re tugging harder and harder on a piece of carpet or tack strip and it suddenly comes loose. It’s like when you fall over in a game of tug-of-war — I almost tumbled to my demise at least twice. Be careful, and keep solid footing!
Rip up the old carpet
To rip up wall-to-wall carpeting, you’ll need a few basic tools:
- Utility knife
- Heavy duty leather work gloves (to protect your hands from tacks)
- Linesman pliers, to tug out staples
- Hammer
- Flat-head screwdriver
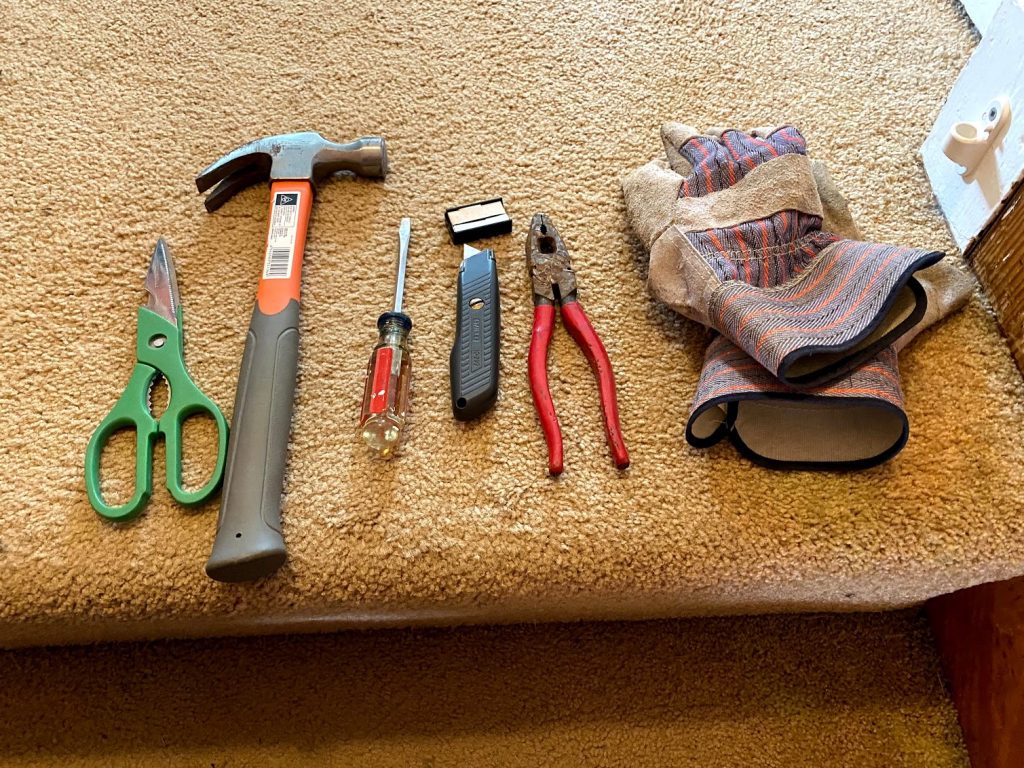
It’s a good idea to wear a dust mask as well, since carpets trap dust, mildew, and other ickies you don’t want to inhale.
This first step is essentially a demolition job, which means it’s messy but not too difficult. To get started, slice the carpet along an edge. Be careful not to gouge the wood beneath it. I found the carpet on the vertical risers was floppy enough to cut into safely — and to create a carpet Muppet:
Then start pulling. You can use your gloved hands (definitely wear gloves, as there are sharp tacks hiding underneath that hold the carpet in place) or your pliers to tug at the carpet.
If it’s not a straight staircase, you might have to rip up the carpet in pieces; our stairs had about five different sections. I tossed each one onto the porch as I went. If the carpet is one long strip, cut it every few feet since it can be heavy and unwieldy. And remember to keep your balance!
Pull up carpet tack strips and underlayment
As the carpet comes off, you’ll need to yank up the underlayment, too:
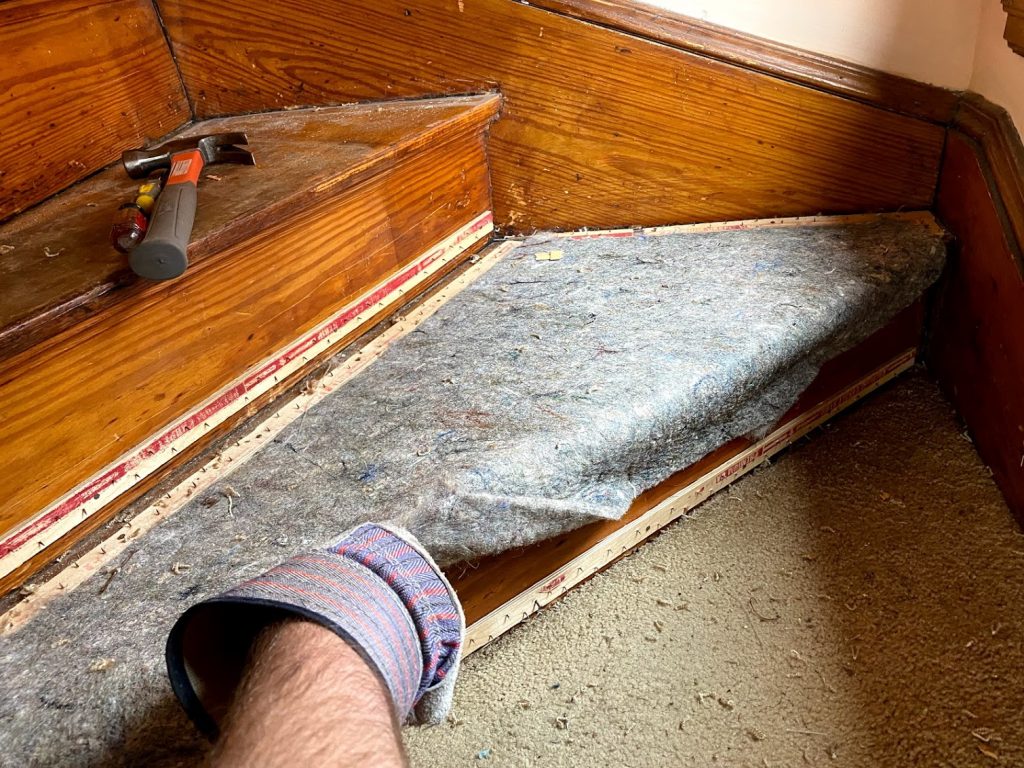
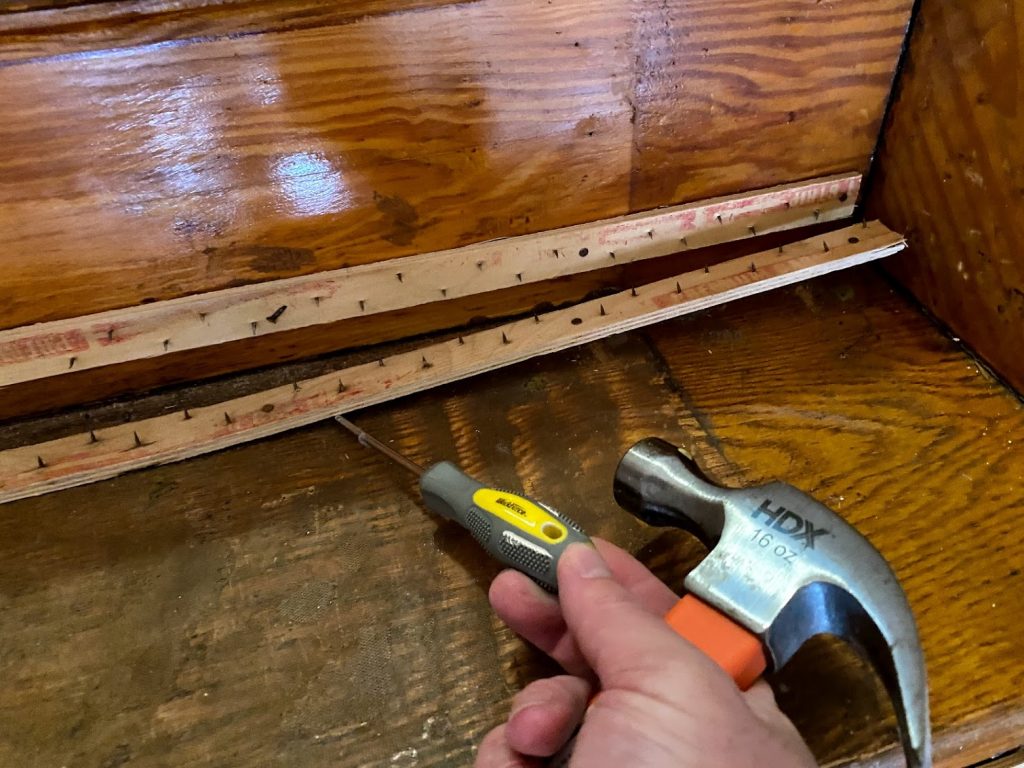
Once the carpet and underlayment is torn up, you’ll be left with an ugly and somewhat treacherous assortment of staples, nails, and tack strips.
Pull up any staples or nails you find using your pliers. (Some of the staples are pretty hard to spot, so this will become an ongoing project over the next few days.)
The tack strips, which held the carpeting in place, have sharp little tacks sticking up, making them pretty nasty to deal with. And you don’t want to leave this step ’til the next day, because they’re just waiting to jab you.
To pry them up, position your screwdriver under each strip, tap it gently with the hammer to chisel it up slightly, and repeat as you move down the length of the board.
Sand the hardwood stair treads
This was the messiest and hardest part, largely because our stair treads were in such bad shape. You could see that, at some point, someone had stuck adhesive treads onto the steps for safety — which had left dark stains and some gooey residue behind.
If you discover that the hardwood flooring under your carpeting needs more than a light touchup, I highly recommend hiring a pro to do this part for you. But we were in the midst of a global pandemic, with pretty much all nonessential business at a standstill — and I wasn’t about to bring some random contractor into the house, even if I could. So I got started sanding.
Actually, first I got started scraping. You can get a lot of the old varnish and residue off just by using a scraper tool with plenty of fresh razor blades.
Then it was time to sand. We have an old electric mouse sander, which, when equipped with coarse 60-grit sandpaper, did a decent job sanding the stair treads and hardwood landings down to bare wood. My hand-me-down sander had a somewhat effective dust catcher, and I followed behind it with our HEPA-filter vacuum and positioned a box fan in the doorway, pointing outside, to suck out any extra dust.
But despite those steps, it still got pretty dusty in the house. And in the cramped confines of a narrow staircase, the sander and vacuum made a holy racket. With Gina and Genny stuck at home due to the quarantine, the dust and noise were all a little too much to deal with, so I started using a hand sander instead, which took longer but was less sensory invasive.
And sanding out the stains was particularly tough. One trick I learned too late — when I was almost done — is to use hydrogen peroxide to get rid of dark stains on old hardwoods.
To do this, soak a dishtowel in peroxide (ordinary 3% solution worked fine, but you can water it down a bit if you’re using a stronger concentration), and lay the rag on the stained area for a few hours or even overnight. This will lighten the wood and help bleach out the dark stains. Let it dry completely — the wood will continue to lighten as it dries.
Peroxide is also a safe and effective way to remove pet urine stains and odors, which is why I discovered it. One reason I was so eager to rip up the carpet was that I swore I could catch a whiff of cat pee in our entryway every so often. I knew the previous owner had a cat who was sometimes locked in the middle bedroom with food and a litter box — and started to deduce that the reason for the cat’s confinement was that it probably peed by the door when the owner left the house.
I thought the carpet must have held some lingering cat pee odors, and that getting rid of it would help — but the smell was worse after pulling up the carpet! The pee had saturated and stained the wood by the front door and, much worse than that, it STUNK.
Soaking the area in hydrogen peroxide worked, though. It lightened the stains (and the rest of the wood around it — but in a brightening way) and eliminated the odor after a couple of treatments. That’s when I discovered I could use it in lieu of sanding to lighten up the stair treads, too.
But my cat urine problems weren’t over yet.
A few days later, I noticed, to my great despair, that the cat pee smell had returned. I used more peroxide, and it went away again. Then it returned. Eventually, I exhausted all the peroxide in the house as well as my patience.
Finally, we came home from a hike, and I saw a puddle on the floor. Our own cat, it turns out, had started peeing in the same spot, since it smelled like some other cat’s pee. She figured I had gone through all this trouble installing a new bathroom, I guess. And with the wood now sanded bare and exposed, the floor had been absorbing the cat pee like a thirsty sponge!
That’s when I bought a giant bottle of Rocco & Roxie’s enzymatic pet urine stain cleaner. That, coupled with a crinkly piece of tinfoil to discourage the cat from peeing there again until I could completely eliminate the smell, seems to have done the trick at long last. Hallelujah!
Prime and paint the trim and risers
If you have an old or antique house, I don’t normally recommend painting original wood trim. While painting old wood sure brightens up a room, it’s an almost irreversible decision.
However, as much as I love our 1920s house, it’s never going to be a historic landmark property. It’s an ugly, hulking, utilitarian two-family — not a charming Colonial or Craftsman bungalow. So we felt no real guilt about painting the stair risers, baseboard, and window trim white.
Painting is a pretty straightforward DIY job, but this was still the second hardest part. For one thing, it took a lot of prep work: I had to thoroughly clean and lightly sand all the trim to prepare the surface. And painting over unfinished wood requires at least 2-3 coats of primer, plus another 2+ coats of enamel or semi-gloss trim paint.
If you’re like me, and painting takes you forever, you want to see results after one coat, not five! I had to keep reminding myself that each coat goes on a little easier and a little more quickly than the last.
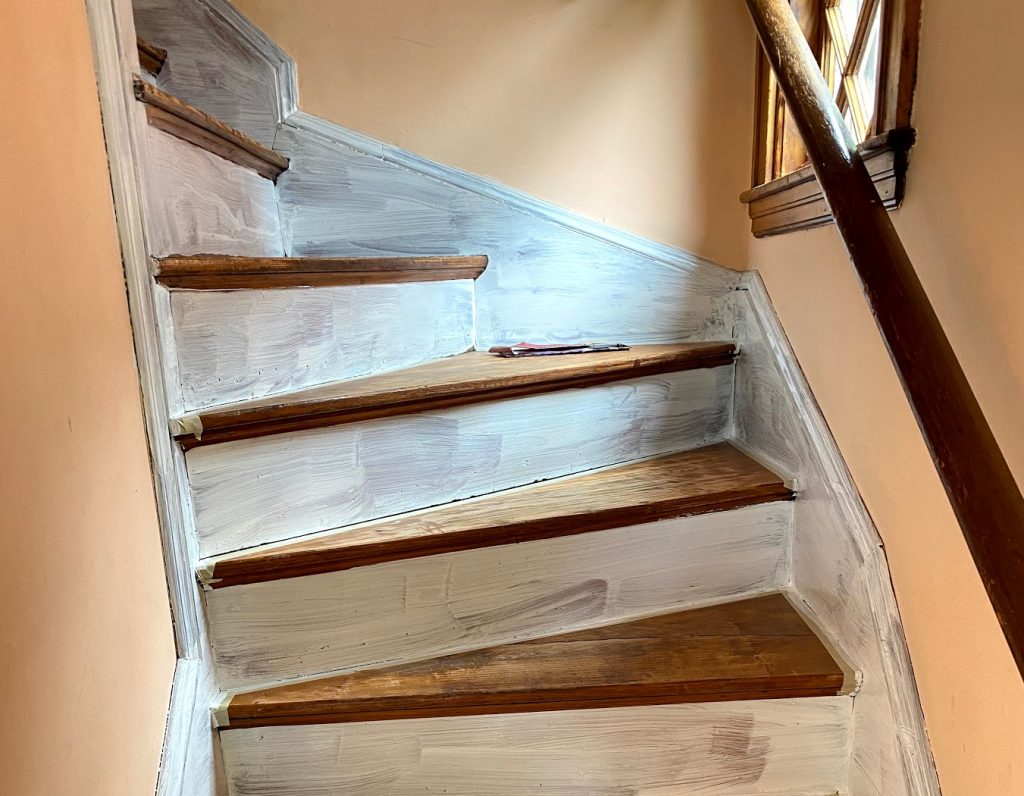
I’m a pretty good artist, but I’ve always been better with a pen than a brush, and as slow as I go, I still make tons of mistakes. About halfway down the stairs, my edges were looking sloppy, so I decided to start using painter’s tape. This took a lot of prep but saved time on painting — a worthwhile tradeoff when five coats are in the cards. BUT, as some pros have said, painter’s tape offers you a false sense of security. Some of the paint bled through the edges, making them just as sloppy as my freehand cut-ins.
It ain’t perfect — but it’s still better than gross old carpet. And that’s what home improvement is all about: improvement, not necessarily perfection.
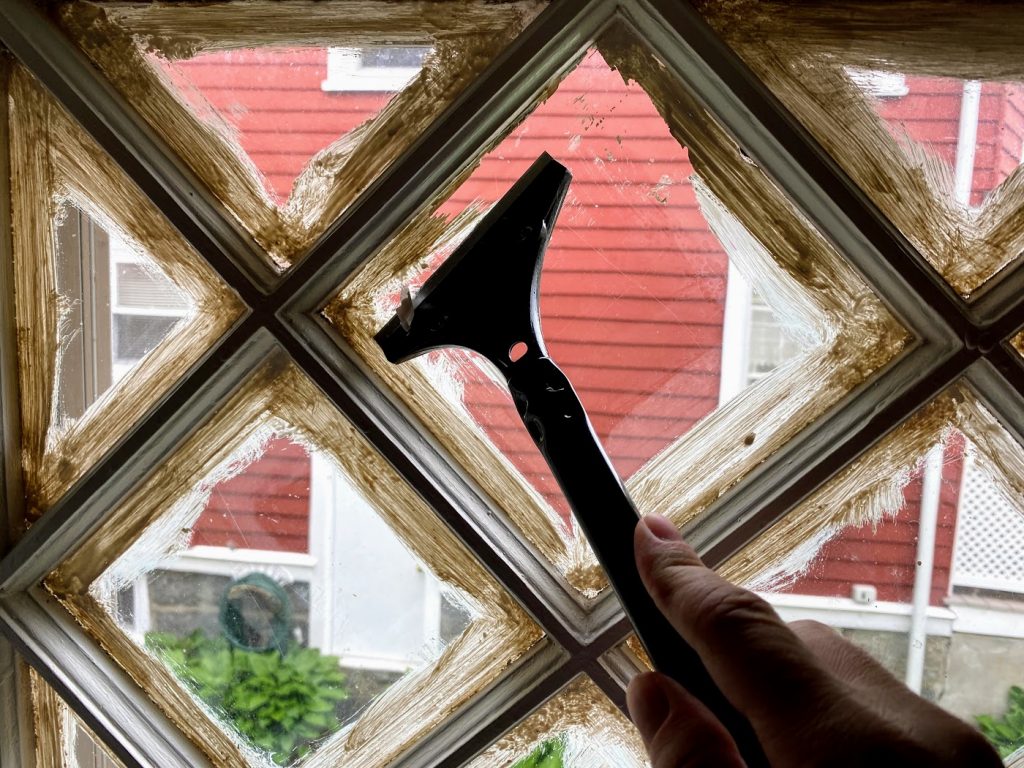
For the stairwell window — an original one, with lattice-style panes — I just slathered the muntins with paint and scraped the excess off the glass with a razor blade after the fact. That was way easier!
Seal the hardwood treads and floors
Stairs and entryways take a beating from muddy shoes and clomping feet, so of course you’ll need to seal the wood with a durable finish.
I had some Minwax Honey Oak wood stain in the garage, so I decided to stain the stair treads for a richer, more consistent finish. But it was really unnecessary, as it turns out. The wood stain took a full day to dry, and the fumes were horrendous. And I didn’t stain the landing, since it already seemed to match the hardwoods in the adjacent rooms pretty well, and it came out just as nice, if not nicer (slightly lighter and brighter).
Hint: If you want to see what your wood will look like after the application of a semi-gloss finish, just wet the wood. That’s what it will look like — rich, darker, shiny.
Instead of polyurethane, which is a little nasty, I used a miraculous, all-natural floor finish called PolyWhey from Vermont Natural Coatings. It uses whey, a byproduct of cheesemaking, as the active ingredient. One quart was all I needed, and it went on easily and looks beautiful.
Cut and install door thresholds
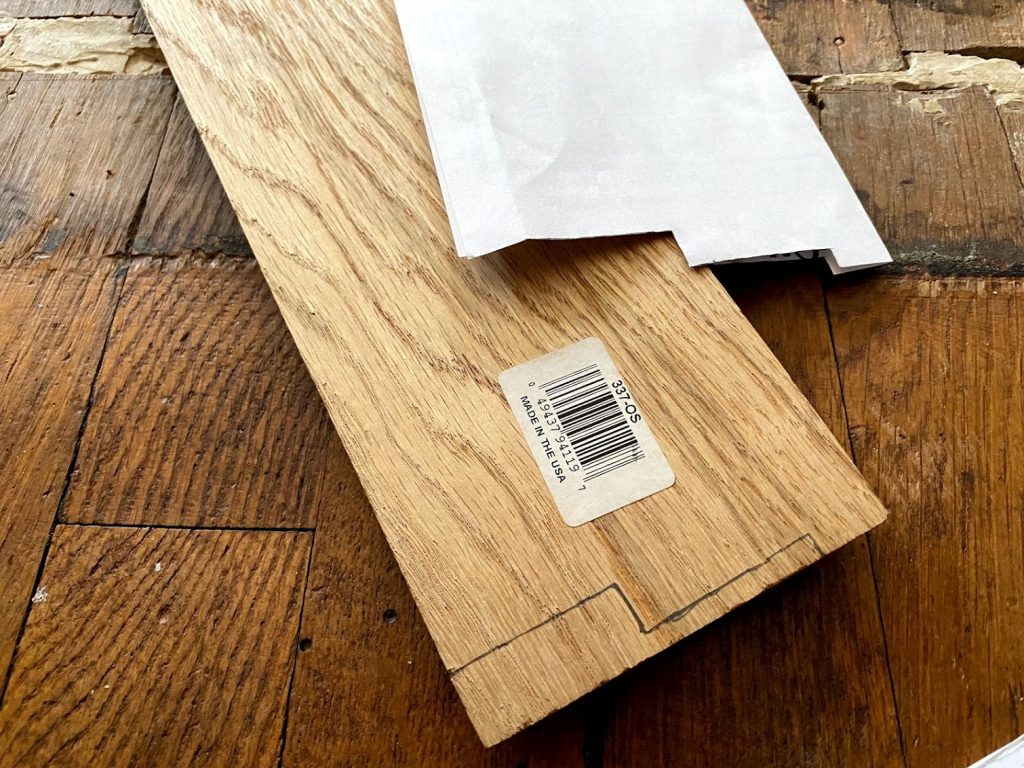
As a final step, I also had to cut and install wood thresholds where the carpet used to meet the three adjacent rooms. I ordered 36-inch blank oak thresholds off Amazon.
To trim them to size, I traced the contours of the doorways onto an old envelope, cut the envelope along those lines, and checked that it fit:
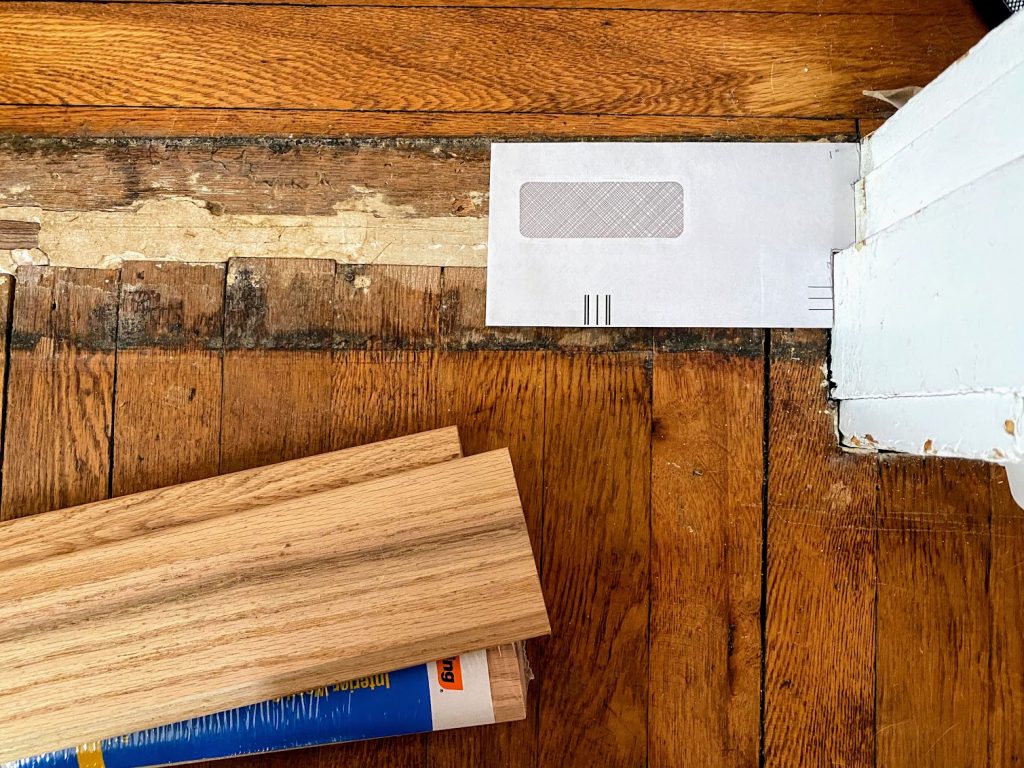
Then I traced the contours onto the wood. You have to do a separate template for each side of the door, as the openings can vary quite a bit, and then get an accurate measure of the space between your two edges.
Then I used a jigsaw and handsaw to cut them to fit the doorways. (One of them needed some sanding before I could squeeze it in place.) After that, nail them into place, and use a nail set to sink the head of the nail where it won’t catch on your socks. And of course, these also got a couple coatings of PolyWhey floor finish.
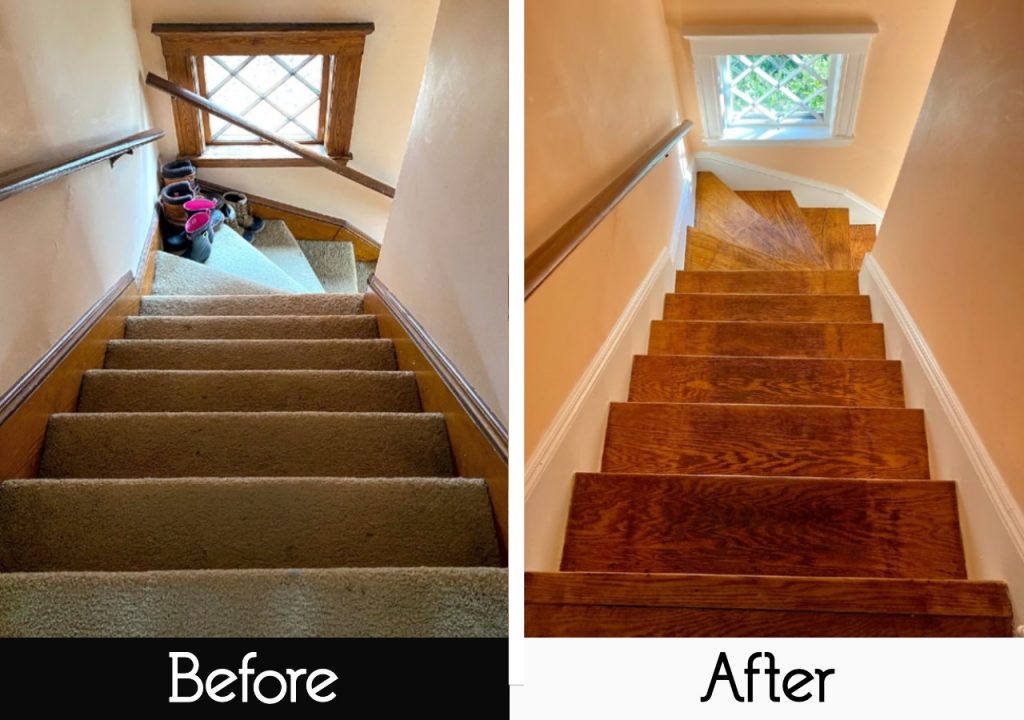
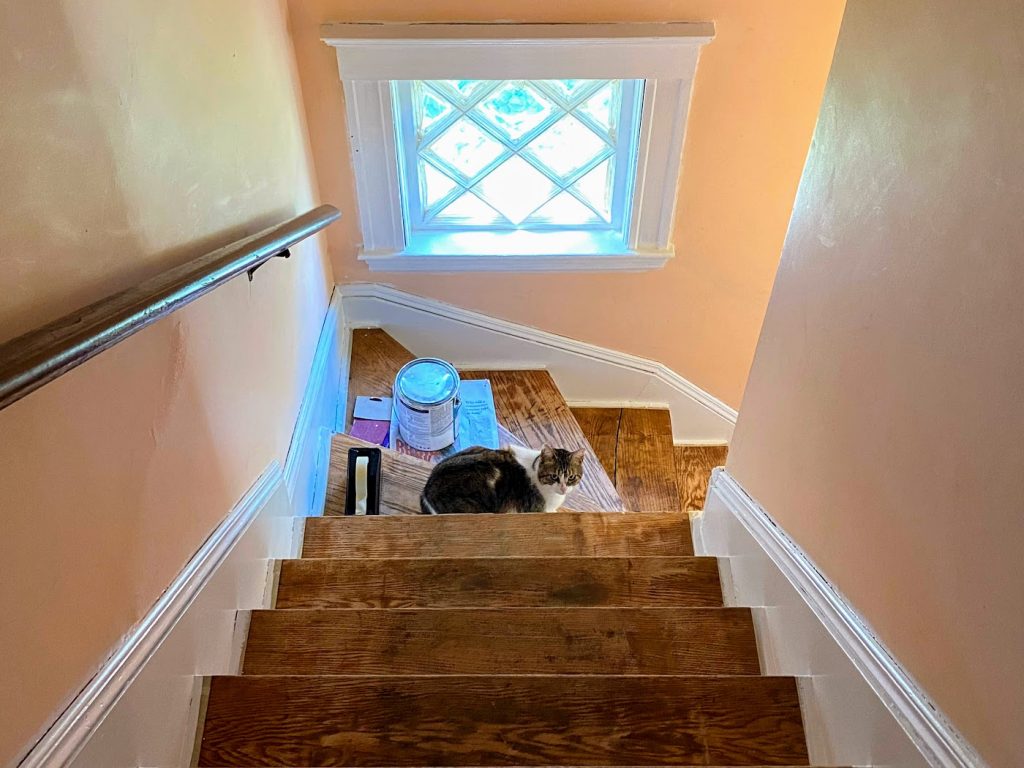
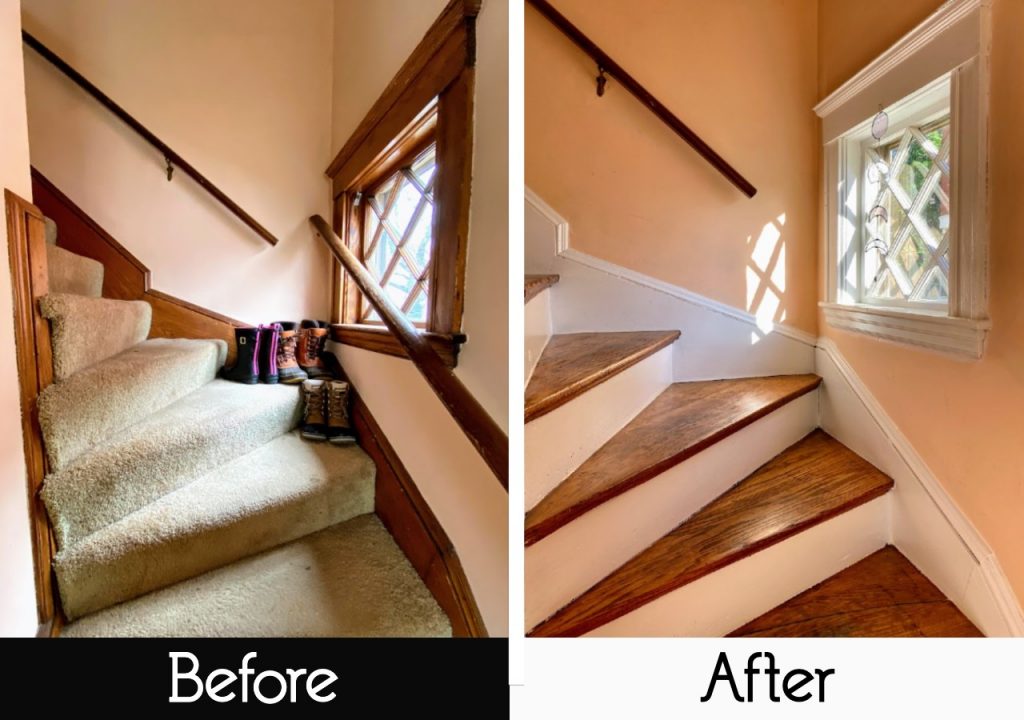
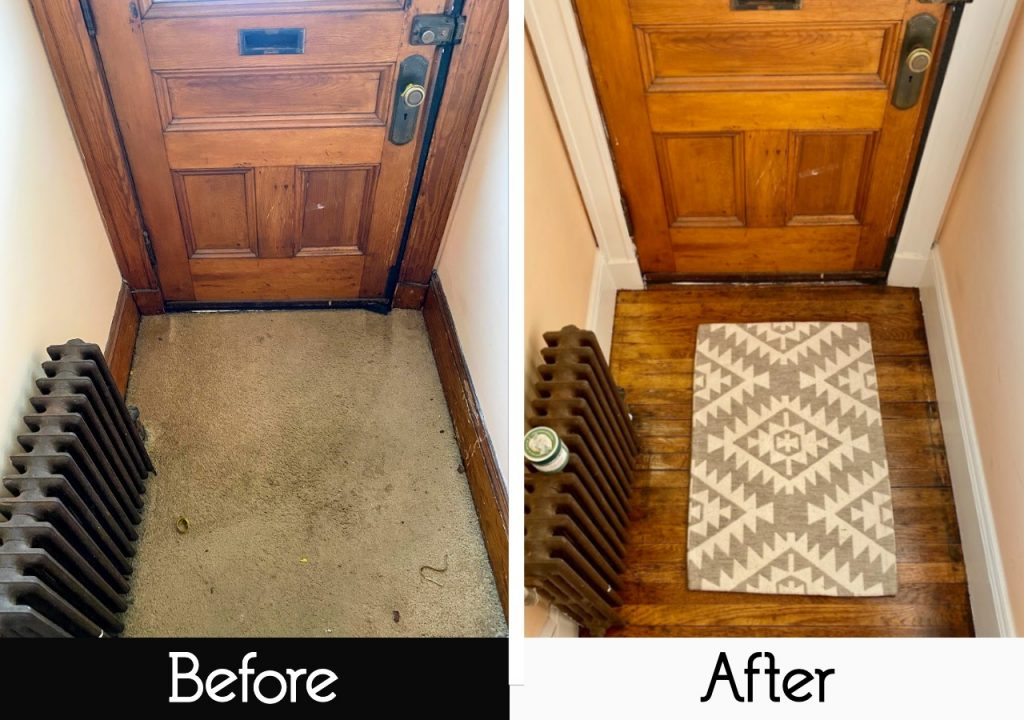
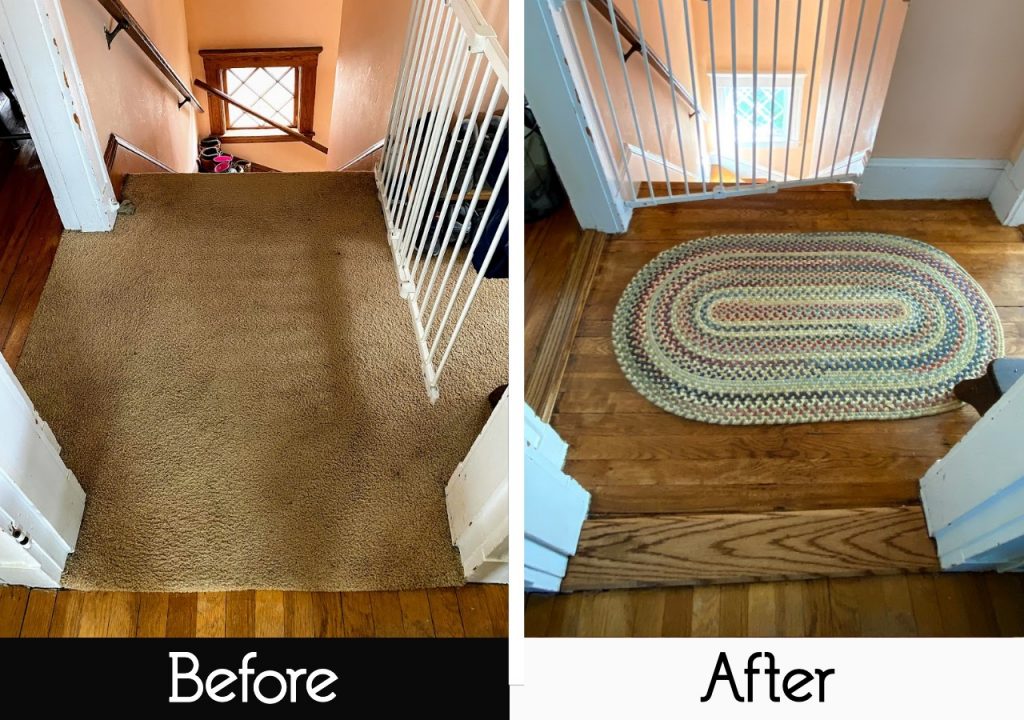
Stairway makeover: Before and after photos
And that’s a wrap. This project wasn’t particularly expensive or difficult — at least, not from a skill perspective. But man, it took ages longer than I expected! (It doesn’t help when your feline assistant keeps sabotaging your efforts!)
But it really was worth it. Even though I covered up some wood in white paint, I exposed a whole lot more hardwood (especially on the landing) that was previously hidden, so I feel good about that. And it’s just so much more warm, bright, clean, and inviting. We’re really happy with how it came out!
Jon Gorey • July 15, 2020